Interior painting is one of the most rewarding DIY projects you can tackle. A fresh coat of paint can completely transform a room, making it feel new again. However, achieving professional-quality results requires more than just slapping paint on walls. This comprehensive guide will walk you through everything you need to know to paint your interior spaces like a seasoned professional.
Why Interior Painting Matters
Your home's interior walls take a beating every day. They're scuffed by furniture, marked by children's artwork, and faded by sunlight streaming through windows. Over time, this wear and tear makes even the cleanest rooms look tired and dated. A fresh coat of paint not only refreshes your space but also protects your walls from moisture and wear.
Beyond aesthetics, painting is an investment in your home's value. According to real estate professionals, a freshly painted interior can increase your home's perceived value by thousands of dollars. It's also one of the most cost-effective home improvements you can make, with professional-looking results achievable even for first-time painters.
Choosing the Right Paint
Not all paint is created equal, and selecting the right type for each room is crucial for long-lasting results. The two main categories are water-based (latex/acrylic) and oil-based paints, each with distinct characteristics and best uses.
Water-Based Paints
Water-based paints have become the go-to choice for most interior applications. They dry quickly, clean up easily with soap and water, and emit fewer odors than their oil-based counterparts. Modern acrylic formulations have also improved significantly, offering durability that rivals oil paints while being more environmentally friendly.
For most interior walls, a high-quality acrylic latex paint in an eggshell or satin finish works beautifully. These finishes offer a subtle sheen that's easy to clean while hiding minor wall imperfections better than flat finishes.
Oil-Based Paints
Oil-based paints excel in certain situations. They level out exceptionally well, leaving behind an ultra-smooth finish that's hard to beat on trim work and doors. Their slow drying time allows brush marks to settle, resulting in fewer lap marks. However, oil paints require mineral spirits for cleanup and longer drying times between coats.
Consider oil-based paints for woodwork, doors, and trim that will see heavy use. They're more resistant to dings and scratches, making them ideal for high-traffic areas. Just be prepared for the additional prep and cleanup time they require.
Preparing Your Space
Professional painters will tell you that preparation accounts for at least half of a successful paint job. Cutting corners on prep work is the most common mistake beginners make, and it always shows in the final result. Taking time to properly prepare your walls will pay dividends in the quality of your finish.
Clearing and Protecting
Start by removing everything from the room or moving it to the center and covering it with drop cloths. Remove switch plates, outlet covers, and any hardware from the walls. Fill any holes with spackle and allow them to dry completely before sanding smooth. The smoother your wall surface, the better your paint will look.
Use high-quality painter's tape to protect trim, ceilings, and any adjacent surfaces you don't want painted. Take time to press the tape edges firmly for crisp lines. Professional painters often use green frog tape or similar low-tack painter's tape for cleaner results.
Cleaning and Repairing
Walls accumulate grease, dust, and cobwebs over time. Clean them thoroughly with a mild detergent solution and allow them to dry completely. For kitchens and bathrooms, consider using TSP (trisodium phosphate) to cut through greasy residue. Any mildew should be treated with a bleach solution before painting.
Inspect your walls carefully for cracks, dents, and holes. Fill small holes with spackle, larger ones with joint compound. Once dry, sand everything smooth and wipe away dust with a tack cloth. Prime any bare spots or repairs before painting to ensure even coverage.
The Painting Process
With your space prepared, it's time to start painting. The key to professional results lies in proper technique and patience. Rushing leads to drips, missed spots, and uneven coverage.
Cutting In
"Cutting in" refers to painting the edges and corners where your roller can't reach. Use a quality angled brush and load it properly—about one-third of the brush bristles. Paint about two inches out from the edge, then blend it smooth. Work in sections so the cut-in areas don't dry before you roll them.
Practice your cutting-in technique on a piece of cardboard first if you're new to painting. The goal is a straight, even line without wobbles or gaps. Professional painters make it look effortless, but it takes practice to develop a steady hand and consistent pressure.
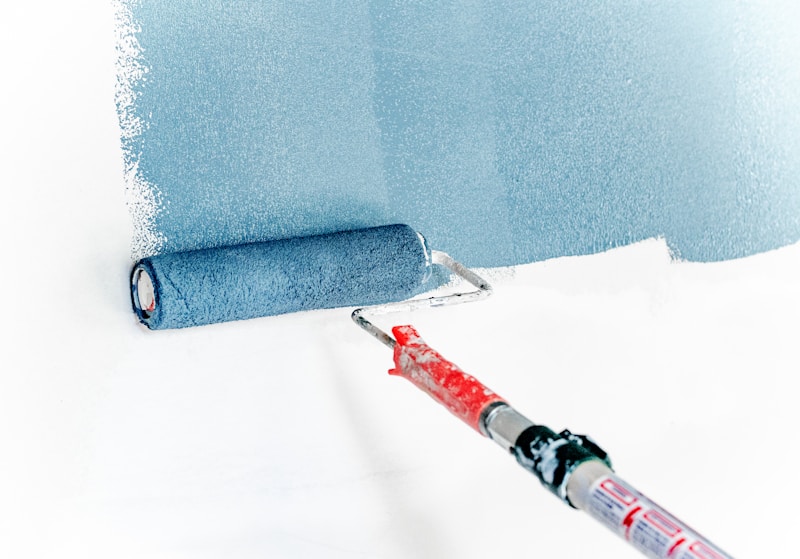
Rolling Technique
Load your roller evenly by rolling it in a paint tray and then working it up and down the grate. This loads the cover while removing excess paint. Apply paint in a "W" pattern, then fill in the space without lifting your roller. Work in sections of about four square feet to maintain a wet edge.
Use the proper nap thickness for your wall texture. Smooth walls work well with 3/8" nap, while textured walls may need 1/2" or 3/4" to reach into all the crevices. Using the wrong nap is a common mistake that leads to inconsistent coverage and missed spots.
Finishing Touches
Once your final coat is dry, carefully remove all painter's tape while the paint is slightly tacky—waiting too long can cause the tape to peel and tear. Touch up any spots you missed, and clean up your supplies properly so they're ready for future projects.
Allow adequate cure time before hanging pictures or moving furniture back against the walls. While paint may feel dry to the touch within hours, it continues to harden for weeks. Being patient during this period ensures a durable, long-lasting finish that will look great for years to come.